Introduction

Digital Literacy Class: We are going to learn about so many incredible ways to be creative, collaborative, and to communicate. We will focus on computer skills and applications. Some topics you already know about, and you will know better, and other topics and applications will be new to you! Either way, we will work together to find the ones you are able to use best. This class consists of Project-Based-Learning. You will be given plenty of time to learn the skills and applications that you will use for a lifetime. I hope you enjoy the material we will cover. - Mr. S

Friday, April 23, 2021

04/23 - 04/26 (HYBRID) Digital Animation Project

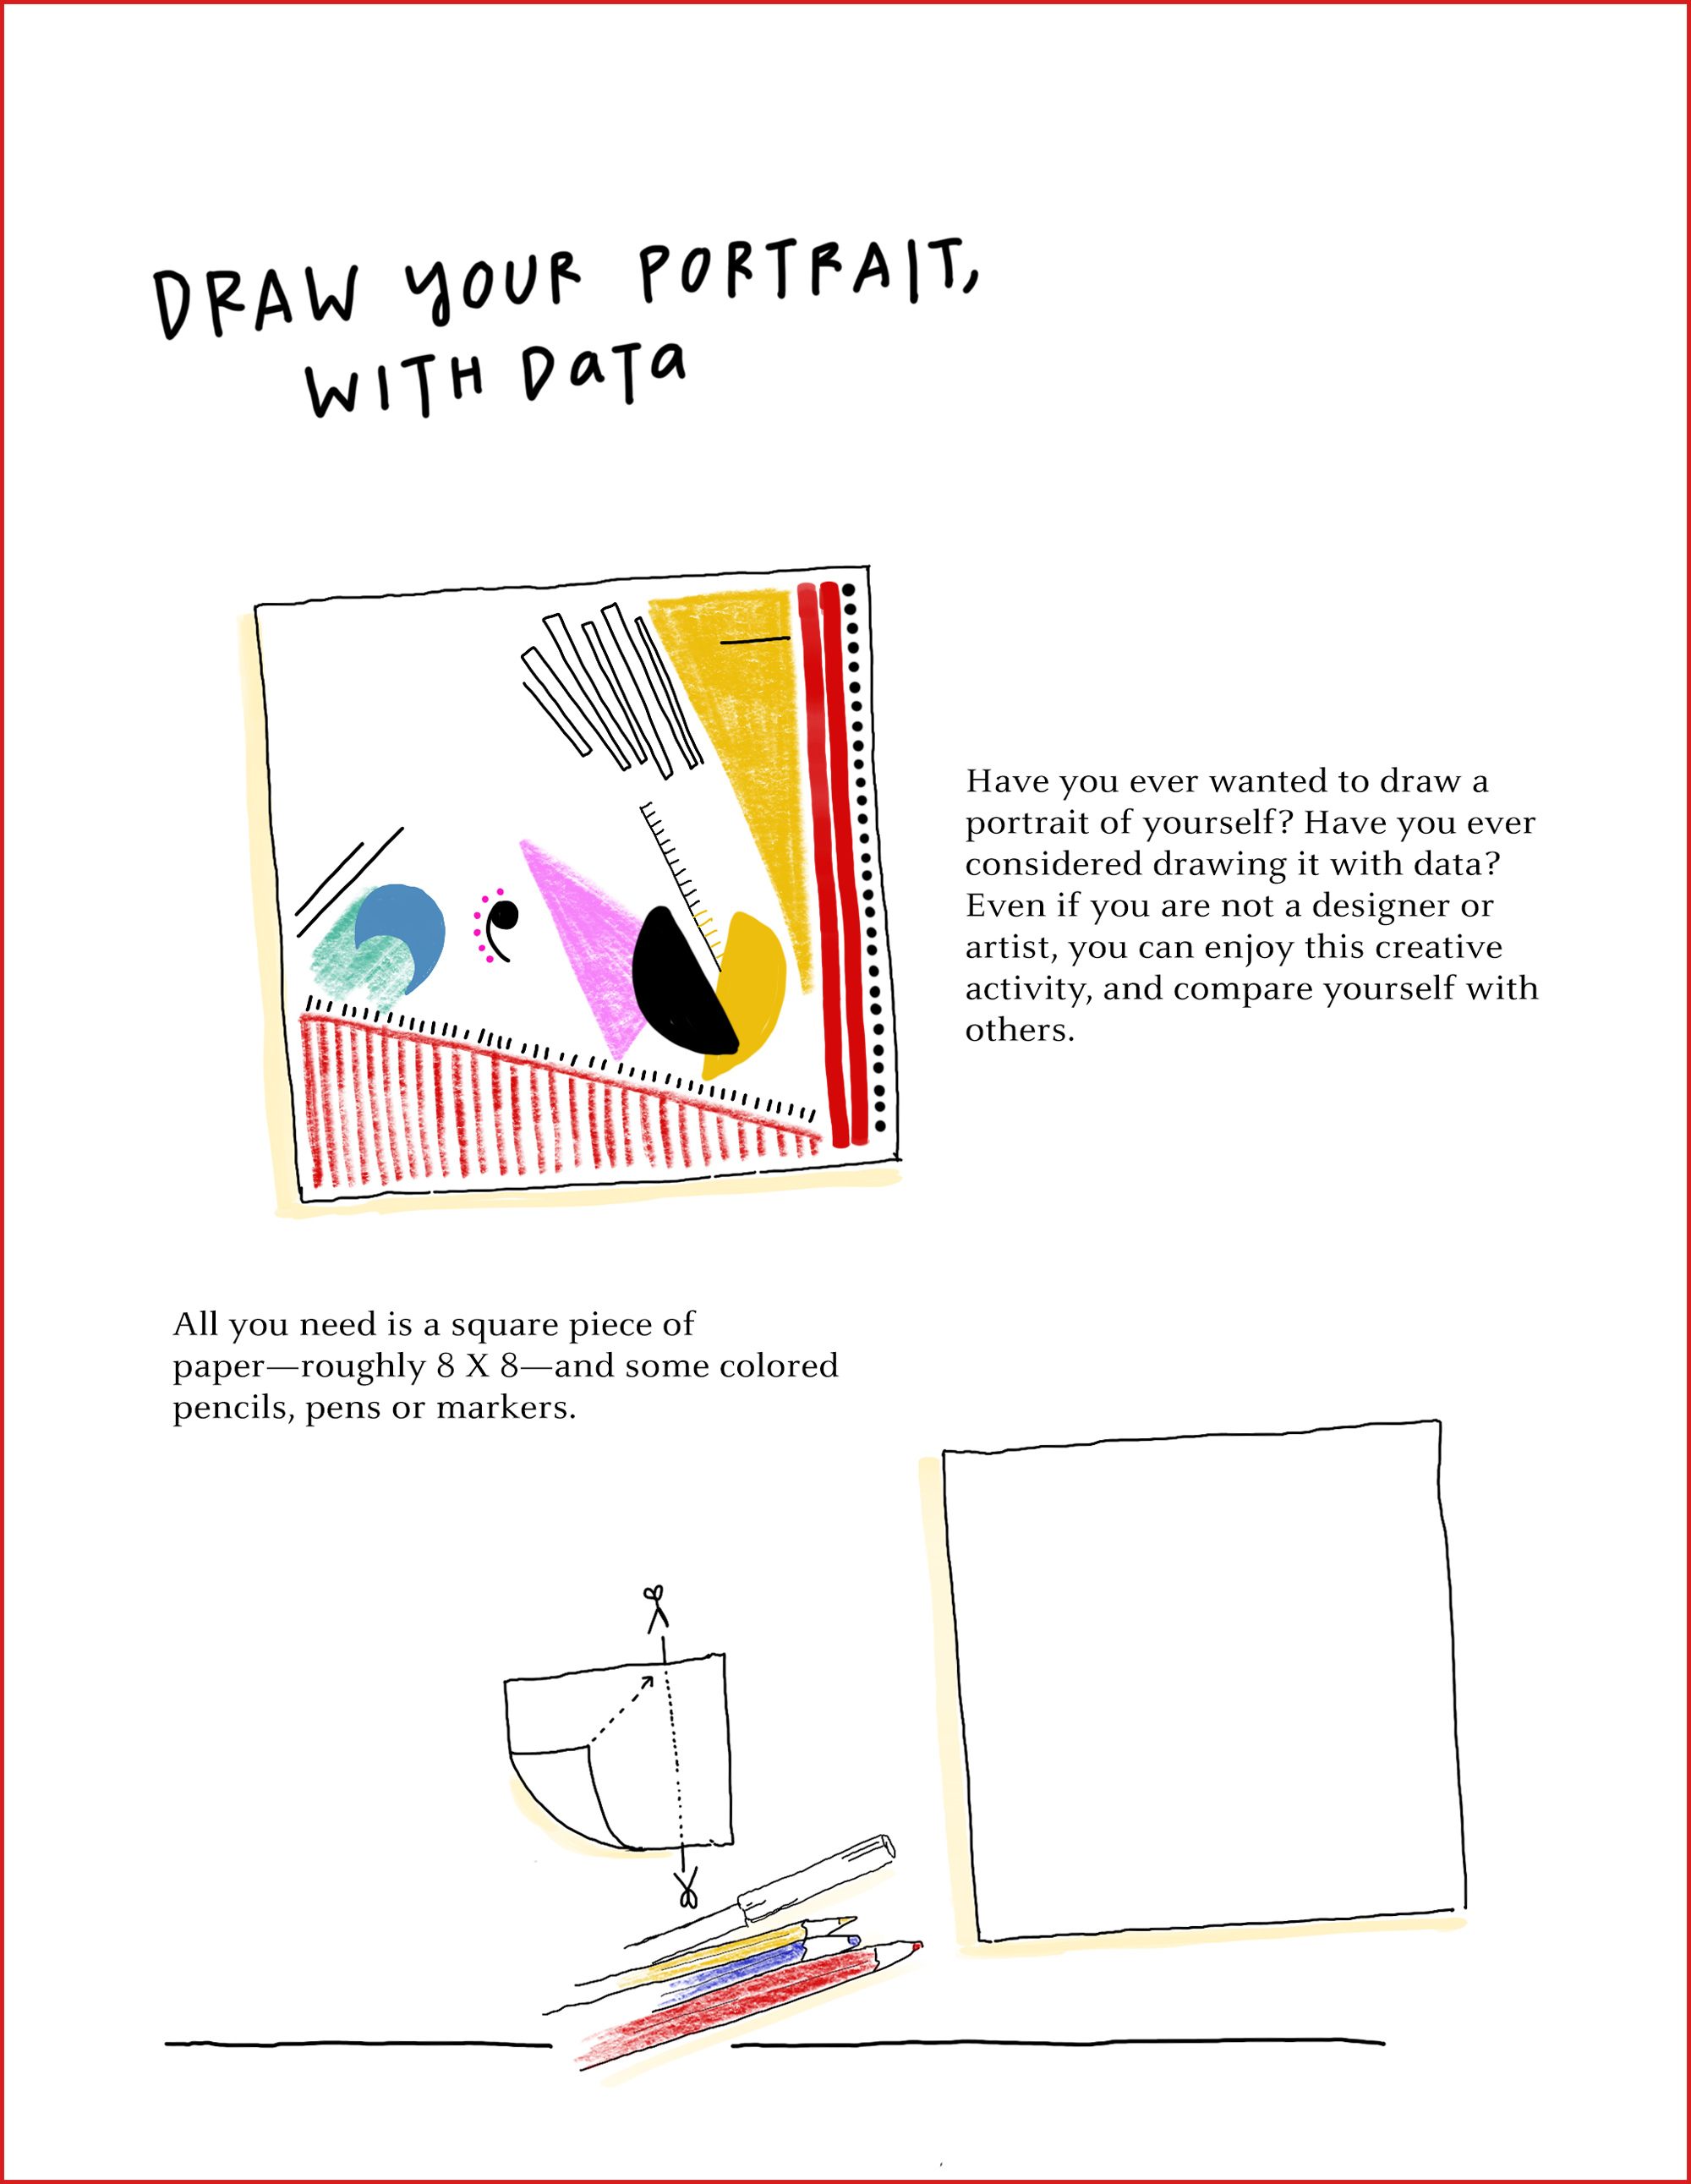
Today you will begin to create a Digital Animation Video Clip. There are many resources for creating digital movies, as listed below. Before class is over, read all the directions in this post and learn about different types of ANIMATION.  Then OPEN Google Slides on your Device and begin to create a "stick-figure" background scene for your longer digital animation using the draw tools found in each of those programs/applications. Before class is over, read all directions in this post and complete these tasks: 

1. Students will watch the History of Animation and the Lego Stop Motion Movie on Youtube.  Complete the Technology Constructed Response Gmail (DO NOW) below.

2. Open Google Slides on Chromebook or Computer and begin to create a "stick-figure" background scene for your digital animation using the draw tools found in each of those programs/applications.  Today you will focus on creating just the background (BASE) slide.  We will create additional slides to show motion during the next lesson.

DO NOW:  Create/Send Technology Constructed Response Email

TO:  Mr. Scribner (harvey.scribner@techfreire.org)
SUBJECT: Digital Animation Project CR

BODY:  Describe, in 1-2 Sentences, what type of animation/cartoon you are interested in creating.  Think about any topic you like, and try to imagine a cartoon that illustrates (and creates action and characters) your idea or subject.  

Resources & Examples
First Animations:


Pixar Examples

Mr. Scribner's Examples

When you make animation you have to create each picture on the film.

There are normally 25-40 pictures per minute. When animating we recreate the laws of nature as we are able to relate to the action. However, with animation we can do a lot more than just follow the laws of nature. We can do anything, we can tell the story just as it is in our dreams.

Animation is a tool of communication.
When we animate we must not forget to put idea and intention in the movements. A movement without idea and intention is boring. Another great communication tool is the contrast; fast/slow, backwards/forwards and so on. If we remember this it makes us animate better. So if you want to animate something going up, you think go down first. If you you want to stretch your character, you squash him first. The best thing is to do the movement yourself or make a friend do it so you can study the movement. This also helps you plan your animation. The better you know what to do, the better you can animate it.

DIGITAL SCENE & BACKGROUND PICTURE CREATION PROJECT DIRECTIONS

A. CREATE A BACKGROUND SCENE TO START WITH:
Step 1: Log into Google on your Device
Step 2: Create NEW Slides Presentation
Step 3: Use the Drawing Tools to make a stick figure scene. Make sure to place specific layers in order and use a variety of colors and styles to make it vibrant.
Step 5: SHARE your PROJECT with Mr. S (harvey.scribner@techfreire.org) for credit.

B. ANIMATE IT:
  • Your project must include at least 10-15 slides minimum.
  • It must have at least 3 layers of depth: Foreground, Middle Ground, Background.
  • It must have at least 3 things moving during the course of the animation. 
  • Your motion must incorporate LAYERS of movement where items move in-front or behind each other.
    Select your BASE SLIDE once it is completely finished, including characters, scenery,
    and any other items you would like to start with.

    Open the Menu for the slide itself and click DUPLICATE.  This will make a copy of the
    slide.

    Make very small changes to the positions of any characters or objects that should MOVE.
    (The smaller the changes, the smoother the animation will be)

    Continue to repeat these steps until you have a minimum of 25 slides for this project.

C. EXPORT SLIDES / CREATE VIDEO CLIP:

    Once you have finished the Animation Step, you will need to highlight each individual slide and click
    FILE and DOWNLOAD.  Select JPEG or PNG as the file type to Download. 

    Repeat this step with every slide.  You may need to make sure that all the slides are in order in a
    digital file folder.

    Open the online application at GIFMAKER.ME and click Upload Images.

    Upload all the images in your digital file.  You may need to resort those images into the proper order,
    Once you are satisfied with the order, adjust the Animation Speed to your preference.
    At this point, if you have a sound effect or music file from Youtube you would like to use, add it.

    When you have completed the steps above, click Create GIF Animation, or one of the other buttons
    listed here, as necessary.  This will create a video file out of your slides.  You will be directed to
    another page to download and share the file.  Download the file to your device and add it to your
    Google Drive to SHARE it for credit.  Good Luck!
  • You must Upload and SHARE your project with instructor using Google Drive for credit.

EXTRA CREDIT OPTIONS
You may also use any other type of digital animation application you are familiar with to create this project.  If you want to make a stop-motion Claymation or Lego video clip, use an application on your phone, or any other idea, just let me know what you are doing to create a short animation clip.  I will literally accept almost anything, both digital or hand-drawn.  Below are a couple of applications you could use to create additional projects for extra credit. 

Use PISKEL or WICK EDITOR to create a simple digital animation and share it with the class during an upcoming lesson.  This can be completed anytime before June 1st.  Learn how to use these fun tools and show off your work to friends and family as well.

Piskel, free online sprite editor. A simple web-based tool for Spriting and Pixel art. Create pixel art, game sprites and animated GIFs. Free and open-source.


Once you have created a PISKEL you are happy with, use upload it to Google Drive and SHARE it or GMail the active link to the project to me for credit.

The Wick Editor is a free, open-source tool for creating games, animations, and everything in-between!  https://www.wickeditor.com/#/

ACADEMIC/LEARNING OBJECTIVE
Scholars will learn the basics of Digital Animation. Scholars will be able to create "mini" animations using an online application. Scholars will also start creating the basic drawing that will be used for a future "line-art" digital animation project. Scholars will be able to complete a Constructed Response about the "History of Animation" and discuss what they like, or do not like about the project.

STUDENTS WILL ENTER THE CLASS QUIETLY AND BEGIN WORKING! 

Scholars will sign into Google Applications as they enter the class. Scholars will read all directions on this post thoroughly. Scholars will then follow the directions above to begin to create a "line-art" background for a future digital animation project.

THANK YOU FOR YOUR ATTENTION AND POSITIVE ATTITUDE TODAY!

Standards Covered In This Class 
PA SAS 9.1.M.PK.J1 / 9.1.V.K.A1-B1
PA 3.7.7 & 11 Section C/ CSTA 2019 / ISTE 2020
CSTA Tied With Common Core ELA/Math rev. 2020


Tuesday, April 20, 2021

04/20 - 04/22 (HYBRID): Personal Data Visualization Art Project

"Designer Giorgia Lupi wants to change the way we think about data — far from being cold facts and numbers, it can be warm and often flawed. Follow her step-by-step instructions to generate a data-driven perspective on the person you know best: you."

Freitas, J., & About the authorJames Freitas is a writer from Massachusetts. (2017, October 02). How to draw your own selfie - using your personal data. Retrieved April 20, 2021, from https://ideas.ted.com/how-to-draw-your-own-selfie-using-your-personal-data/

The following project will help you understand how data can be used to create visualizations that help others understand it more easily.  Many examples exist in our world, and many careers are increasingly relying on these types of visualizations to make sense of the vast amounts of data that are generated by almost everything we do.  From our shopping and personal habits, to the large amounts of data created by almost every field of study, it is sometimes easy to become "lost" in the numbers and stacks of random tables that the data is organized into.

"Remember that data, like us, is imperfect. “It’s time to leave behind any presumption of absolute control and universal truth,” says Lupi.  Since we get our data from humans; it’s riddled with human error and tainted by biases. We should embrace these imperfections, just as we embrace imperfections in ourselves and others. These portraits are only the start of forming a new relationship with your data. Once you feel more connected to it, you’ll see it differently. We must treat data “as the beginning of the conversation,” Lupi says, “and not the end.”" - IDEAS.TED.COM (article references above)

Please spend some time tomorrow (ASYNCH WEDNESDAY) watching the following video about this project:


Assignment #1 (❗️):  Students will create an original art piece using skills and tools (SKETCH.IO) from the last lesson.  Students will open the following Data Selfie Digital Art Project Google Slides (Click Here) and follow all the directions to complete their personal data portrait.  Once completed students will need to upload their final project to their Google Drive and SHARE it with Mr. S (harvey.scribner@techfreire.org) for credit.  Students should also post this project to the main page of their Student Digital Portfolio (Quarter 1 Project).


Learning Objectives

After this lesson students will be able to:

  • define digital art
  • discuss the history of digital art
  • explain how digital art is used today
  • create some basic examples of digital art

Curriculum Standards

  • CCSS.ELA-Literacy.RH.11-12.4

Determine the meaning of words and phrases as they are used in a text, including analyzing how an author uses and refines the meaning of a key term over the course of a text (e.g., how Madison defines faction in Federalist No. 10).

  • CCSS.ELA-Literacy.RH.11-12.5

Analyze in detail how a complex primary source is structured, including how key sentences, paragraphs, and larger portions of the text contribute to the whole.

  • CCSS.ELA-Literacy.RH.11-12.7

Integrate and evaluate multiple sources of information presented in diverse formats and media (e.g., visually, quantitatively, as well as in words) in order to address a question or solve a problem.

Materials

  • Computers with Internet Access and Sketchpad.IO or similar application
  • A photo of digital art

REFERENCES
https://study.com/academy/lesson/digital-art-lesson-plan.html 
https://sites.google.com/a/greenvilleschools.us/millerdigitalarts/art-1
https://www.ted.com/talks/giorgia_lupi_how_we_can_find_ourselves_in_data
https://ideas.ted.com/how-to-draw-your-own-selfie-using-your-personal-data/

Thursday, April 15, 2021

04/15 - 04/16 (Hybrid): Introduction to Digital Art & Sketchpad.IO

In today's class, students will be introduced to the discipline of digital arts through the exploration of Sketchpad.IO. Students will learn about the basic elements of art, and how to use the various tools when using a digital drawing application.  The art that the students create will be two- dimensional and entirely created on the computer or with a camera. There will be opportunities for students to expand their creativity and push their minds to the limit. Students will create self-portraits, digital photographs, collages, digital paintings, or other projects to show mastery.


Assignment #1 (❗️):  Students will create an original art piece using at least 3 of the 5 Elements of Art discussed in class.  This can be a self-portrait, landscape, or can represent any other genre of digital art.  All submissions MUST Conform to the requirements outlined in the Freire Schools Student Handbook for appropriateness for subject matter or topic.  

You must submit your digital art using both Gmail and Dropbox for credit.  Please attach your project to a Gmail to MR. S (harvey.scribner@techfreire.org), and use the following dropbox link:


SKETCH.IO In-Class Reference Website
https://sketch.io/news/2018/05/using-sketchpad-with-google-classroom/

Learning Objectives

After this lesson students will be able to:

  • define digital art
  • discuss the history of digital art
  • explain how digital art is used today
  • create some basic examples of digital art

Curriculum Standards

  • CCSS.ELA-Literacy.RH.11-12.4

Determine the meaning of words and phrases as they are used in a text, including analyzing how an author uses and refines the meaning of a key term over the course of a text (e.g., how Madison defines faction in Federalist No. 10).

  • CCSS.ELA-Literacy.RH.11-12.5

Analyze in detail how a complex primary source is structured, including how key sentences, paragraphs, and larger portions of the text contribute to the whole.

  • CCSS.ELA-Literacy.RH.11-12.7

Integrate and evaluate multiple sources of information presented in diverse formats and media (e.g., visually, quantitatively, as well as in words) in order to address a question or solve a problem.

Materials

  • Computers with Internet Access and Sketchpad.IO or similar application
  • A photo of digital art

REFERENCES
https://study.com/academy/lesson/digital-art-lesson-plan.html 
https://sites.google.com/a/greenvilleschools.us/millerdigitalarts/art-1


Wednesday, April 14, 2021

Be Proactive (Habit#1) / Pixlr.com: Create a Meme Collaboration Lesson 20/21

Today we will be responding to a quick Google Form to get the class going! Please watch the video together and then open the form by clicking the link below to respond. We are quickly discussing Habit #1 from the 7-Habits of Highly Effective People (Covey).

If you missed our discussion, please click and view this link 

(Habit #1 Video) and send an email as outlined below the assignment/project for today.


Click Here to review all of the 

7 Habits of Highly Effective Teens (Covey)!


READ THE DEFINITION OF HABIT#1 BEFORE REPLYING TO THIS SURVEY:


1. Be Proactive

Being proactive is the key to unlocking the other habits. Help your teen take control and responsibility for his/her life. Proactive people understand that they are responsible for their own happiness or unhappiness. They don't blame others for their own actions or feelings.


MEME PROJECT (Belong-Meme):


"Feeling like you are part of a group while knowing you are special for who you are. Your uniqueness and individuality is what makes you a special and important part of school. It is important for you to feel a sense of Belonging in order to be truly who you are and who you want to be" (Quagley, Corso, & Hellerstein 2015)

Everyone in Digital Technology should be able to create a MEME about Belonging, Respect, Tolerance or Being Proactive. This MEME MUST CONFORM to PALCS Rules & Regulations about appropriate content. Once you have completed your entry, use the DropBox Link below to upload it for credit, and Add It to the Google Slides Document for review and peer comments.


Remember, Comments MUST be constructive and positive, negative comments will be filtered and those posting them will be subject to consequences for violating class honor code.


STEP BY STEP DIRECTIONS:
Find a picture online (Must Conform To PALCS Standard Use Guidelines) and use PIXLR.Com to change it and make it your own. Follow the directions below:

1. Choose Picture from Google Images
2. Save Picture to Desktop
3. Open PIXLR.COM (PIXLR X)
4. Load Picture into PIXLR.COM (PIXLR X) Application from Desktop
5. Make changes to picture
a. You must add some text for the MEME. You can also add background, and change the color or another feature for credit.
6. Save Formatted Picture to Desktop
7. SIGN-IN TO YOUR GOOGLE DRIVE, CLICK NEW AND UPLOAD FILE AND CHOOSE THE PICTURE YOU JUST CREATED.
8. Once you have Uploaded the File, SHARE it with Mr. S (hscribner.edtech@gmail.com) for credit.
9. PLEASE CLICK THIS LINK (https://www.dropbox.com/request/XwqNrrZNatghgxf80i8j) and UPLOAD your file here in addition to SHARING it with me on Google DRIVE.

If you are finished early, log into your Typing.Com or Khan Academy account and work on your typing practice. I hope you enjoy this project as we start to think about future projects for this school year.


EMAIL PROMPT IF YOU MISS CLASS:


Subject: HABIT 1 (COVEY)PROMPT: How will you try to "carry the weather with you" from now on. What can you do to encourage others to see this as an important first step in being more mature?


(Please write at least 4-5 Sentences about the PROMPT above using proper grammar, spelling, and sentence structure. You must restate the PROMPT in your own words as part of your entry.)


You must write your response in the R.A.C.E.S. Method (As discussed in class prior to today)

(R-Repeat the Question, A-Answer the Question,C-Cite your Evidence, E-Explain your Evidence or Examples, S-Summarize your Thoughts)


OBJECTIVE & STUDENT OUTCOMES


Students will complete a short writing assignment. Students will then learn to upload, manipulate, adjust, save and share digital images with an online application.  Students will be able to use a Dropbox Upload Link, and Upload files to Google Drive and SHARE them for credit or collaboration.


STUDENTS MUST READ ALL DIRECTIONS ON THIS WEBSITE PRIOR TO STARTING ANY ASSIGNED TASKS TO RECEIVE FULL CREDIT FOR THIS PROJECT.


Students will use Google Images to select pictures for use today. Students will Copy the pictures selected to the desktop of the computer they are working with. Students will learn how to use PIXLR.Com to upload, manipulate, adjust, save and share the picture online. Students must complete the steps below to CREATE and SHARE a Themed Photo Collage for credit.


STANDARDS


Common Core:


CCSS.ELA-LITERACY.CCRA.W.4:  Produce clear and coherent writing in which the development, organization, and style are appropriate to task, purpose, and audience.


CCSS.ELA-LITERACY.CCRA.W.6:  Use Technology, including the Internet, to produce and publish writing and to interact and collaborate with others.


21st Century Skills: Communication and Collaboration, Information, Communications and Technology Literacy


ISTE/NETS: Students: Digital Citizen, Students: Innovative Designer, Students: Knowledge Constructor


CSTA: 3A-AP-22: Design and develop computational artifacts working in team roles using collaborative tools.
Collaborative tools could be as complex as source code version control system or as simple as a collaborative
word processor. Team roles in pair programming are driver and navigator but could be more specialized in
larger teams. As programs grow more complex, the choice of resources that aid program development
becomes increasingly important and should be made by the students. Students might work as a team to
develop a mobile application that addresses a problem relevant to the school or community, selecting
appropriate tools to establish and manage the project timeline; design, share, and revise graphical user
interface elements; and track planned, in-progress, and completed components.


LESSON SOURCES:

Quaglia, R., Corso, M. & Hellerstein, J. (2015). Student voice : turn up the volume, 6-12 activity book. Thousand Oaks, California: Corwin, a SAGE Company.  https://books.google.com/books?id=Q0r7CAAAQBAJ&pg=PA18&lpg=PA18&dq=Create+a+Meme+from+a+photo+common+core&source=bl&ots=SyYwcL4kKK&sig=ACfU3U02yfCiIBsS8C3bbF2AyLsJOqOFqg&hl=en&sa=X&ved=2ahUKEwjw3trg8-joAhWGTt8KHUujBTUQ6AEwDnoECAwQKQ


Covey, S. (2004). 7 habits of highly effective teenagers. London: Simon & Schuster.  


Monday, April 5, 2021

04/06 to 04/09 (ASYNCH WEEK): NOVA LABS Cyber Security Introduction


NOVA Labs - CyberSecurity Lab


(❗️) Complete a Gmail Response, after "playing" the game at the website below, about CyberSecurity at home, at school, or in a future career.  What should high school students know about CyberSecurity? (In Your Own Words!). 

Use the R.A.C.E.S. Method  R - Repeat the Question, A - Answer the Question, C - Cite Evidence, E - Examples / Explanation, S - Summarize your Thoughts

Sample Gmail
To:  harvey.scribner@techfreire.org
Subject:  Nova Labs CyberSecurity
Body of Email:  2-3 Sentences to answer the question listed above about CyberSecurity.

Whenever we go online—to shop, chat with our friends, or do anything else—we put ourselves at risk of cybercrime. Computer viruses can corrupt our files, hackers can steal our data, and criminals can trick us into revealing sensitive information. But luckily there are simple steps we can take to protect our digital lives.


Take cybersecurity into your own hands. In this Lab, you’ll defend a company that is the target of increasingly sophisticated cyber attacks. Your task is to strengthen your cyber defenses and thwart the attackers by completing a series of cybersecurity challenges. You’ll crack passwords, craft code, and defeat malicious hackers.

The Cybersecurity Lab is a game designed to teach people how to keep their digital lives safe, spot cyber scams, learn the basics of coding, and defend against cyber attacks. Players assume the role of the chief technology officer of a start-up social network company that is the target of increasingly sophisticated cyber attacks. In the game, players must complete challenges to strengthen their cyber defenses and thwart their attackers. The Lab also features stories of real-world cyber attacks, a glossary of cyber terms, and short animated videos that explain the need for cybersecurity, privacy versus security, cryptography (cyber codes), and what exactly hackers are.
There are four major gameplay components of the Lab:
  • Coding Challenge: An introduction to very basic coding skills. Players program a robot to navigate a maze, using drag-and-drop commands. 
  • Password-Cracking Challenge: A series of “password duels” teach players the basics of how attackers might try to crack their passwords and how they can make better, more secure passwords.
  • Social Engineering Challenge: Players are presented with two apparently similar emails or websites. They must first identify the differences between them and then decide which one is a scam attempting to steal their information or money. This challenge also includes a number of audio recordings and transcripts of phone calls; players have to decide if they should trust the caller or not. 
  • Network Attacks: As their companies grow, players must buy defenses to defend themselves against a series of cyber attacks. The better that players do in the three challenges, the more resources they’ll have to buy defenses.
Note: The Coding Challenge uses a Blockly interface that requires no prior knowledge of coding. Blockly uses a visual representation of code as blocks rather than a scripted programming language.

Time Allotment

75 minutes

Grade Level

6–12 grade

Standards Alignment Guide

The Cybersecurity Lab reinforces scientific and engineering practices and crosscutting concepts found in the Next Generation Science Standards. To see how the Cybersecurity Lab can be used to meet course objectives, download our standards alignment document below:

Glossary of Cybersecurity Terms

The Cybersecurity Lab contains terms that may be unfamiliar to educators and students. In the game, these terms are highlighted with definitions that appear as mouse-overs. Below is a document with all of these terms:

Content Objectives

  • Students will be able to explain computer science terminology related to coding, password protection, social engineering, and network security
  • Students will be able to describe how encryption works to protect privacy
  • Students will be able to describe recent network security breaches and how companies defend against them
  • Students will be able to explain why the term “hacker” is extremely flexible and the variety of roles that hackers play
  • Students will be able to analyze reports of unfolding security breaches and apply their understanding of security networks to them

Process Objectives

  • Students will be able to navigate a robot through a maze using Blockly code in the Coding Challenge
  • Students will use analytical reading skills to distinguish among phishing attempts, fraudulent websites, and phone scammers in the Social Engineering Challenge
  • Students will use logical reasoning to create strong passwords in the Password-Cracking Challenge

Materials

  • The Cybersecurity Lab is accessible on web and mobile browsers that support HTML5, including Chrome, Firefox, Safari, and Internet Explorer (version 9.0 and higher)

Multimedia Resources

The Cybersecurity Lab includes four short animated videos that cover a variety of cybersecurity and computer science topics:

Cybersecurity 101

The Internet is fundamentally insecure. However, there are simple things you can do to protect yourself and your information. This video also provides an introduction to the activities in the Cybersecurity Lab.

Cyber Codes

Do you trust the security of your email, text messages, and browser history? Learn how trustworthy online communication actually is and how encryption can protect your privacy. Sometimes.

The Secret Life of Hackers

Hackers may not be who we think they are. In fact, you might be a hacker and not even know it. Learn the true meaning of hacking and some of the many reasons hackers hack.

A Cyber Privacy Parable

Follow the trials and tribulations of Tim as a seemingly innocent piece of information threatens to ruin his life when it falls into the wrong hands.

Dragons Breathe Fire

Dragons Breathe Fire